

One of the most asked question when it comes to falconry equipment is how do you build the mews. You can make these enclosures as elaborate as you want. One chamber, one chamber and a small equipment room on the side. Two rooms and a weathering yard attached. It’s really up to you and your budget.
This design is as basic as you can get, but it’s a good place to start.
This mews is designed with the panels on the outside. Many falconers put the panels on the inside to avoid any areas the bird might try to land. The only horizontal 2 x 4’s in this design are for the windows, there are no areas for the bird to land.
I’ll take you step by step on how to build this simple mews.
Be sure to read these instructions all the way through before you start. There are some alternative instructions for some steps. You may decide to use one of them instead.
You can do 90% of the work by yourself. Depending on what style roof you use, you might need someone to help get it on. It can be quite intimidating to start this “little” project, but if you take the steps one at a time, you can do it.
Supplies
The cost of this mews will be anywhere from $400 to $600 depending on the price of lumber in your area.
• 50 – 2 x 4 x 96″ – Make sure they are actually 8′ (96″) long. Studs are sold as 8′ but are actually only 7′ something.
• 9 – 4′ x 8′ x 1/2″ 3 ply CDX plywood – It’s really not necessary to use thicker plywood, but you can if you want. There is also composite plywood used for roofing. These already have waterproofing added and can be used for the whole mews or just the roof.
• 4 – 2 x 4 x 8′ Pressure treated wood or 35 pavers
• 22 – 3/4″ outside dimension 10′ metal electrical conduit. These are sold as 1/2″ tube conduits. DO NOT USE PVC PIPE OF ANY KIND.
• Large box of deck screws – for screwing the plywood to each frame. Might as well get two boxes. I hate it when I run out of something like screws and have to run the hardware store again
• Large box of 2 1/2″ Screws – for screwing the frame together and to screw each panel together (I hate nails, they never, ever hold. Don’t waist your time with them)
• 3 – hinges for door
• 2 – handles for door – one for the inside and one for the outside
• 4 – 2 x 2’s to brace the door. You can use 2 x 4’s here too if you want
• 1 – hook and eye for the inside of the door
• 1 – latch for the outside of the door – This is so you can lock your mews. Find the kind where the “eye” of the latch swivels
• 1 – pad lock – Never leave your mews unlocked. Too many birds have been stolen or released by do-gooders
• Screening for all the windows. Lets face it, your mews may not be completely bug proof, but you want to prevent as many wasps, mosquitoes and flies from getting in.
• 12-16 – rubber mats – these can be found at the hardware store and are for shop floors to stand on. These mats go together like puzzle pieces. They lay on top of the pea gravel and makes the floor easier to clean and will keep your birds talons sharp as a surgeon’s scalpel.
Optional supplies
• Garden cloth – enough to cover the 8′ x 8′ area with a couple of layers – This allows the water to drain out, keeps the dirt from working it’s way to the top and prevents any weeds from coming up.
• “U” shaped stakes – You can find these in the garden section. They should be with the garden cloth. Get plenty. If you don’t use the garden cloth, you won’t need these.
• Hardware cloth or chicken wire – This is especially important if you live in areas where there are raccoons and skunks. The hardware cloth prevents these critters from digging their way into the mews and killing your bird. Again, this will depend on where you live. I have skunks in my area, but not raccoons. So I don’t use this and have not had any problems. Gophers too can be a problem, but I trap them whenever I see them.
• Pea gravel – this is for the floor – you’ll need enough to cover the entire 8′ x 8′ at least 2″ deep. 3″ is better.
• Sealer – I recommend paint. I’ve tried stain and even marine varnish, but they just don’t last more than a few years. With paint, you can match the color of your house. You will need to apply two coats. inside and out.
Tools Needed for this project
• electric drill with phillips bit
• Circular saw
• jig saw – to cut out the door and the opening for the feeding shoot
• 2 clamps – to hold the 2 x 4’s together while you drill the holes for the window
• ruler – to mark the placement of the holes for the windows.
• 7/8″ paddle bit – to drill the holes for the conduits for the windows
Your Area
Keep in mind when building this mews what weather you have. I live in California and the weather here isn’t overly wet or cold. Also remember to check with your local building codes to see if you need a permit to build the mews. Here, because it’s not a permanent structure a permit isn’t required. It’s consider a shed.
If you live in a very cold winter climate, you might want to make a way to close off the windows with some kind of shutter or removable panel. You also might want to run electricity to your mews for heat and lights. But that’s something I can’t advise you with as I am not an electrician.
Mews placement

The first thing you need to do before you get all your lumber home is determine where the mews is going to go. I like to have the windows face East so the birds get direct morning sun. But this is going to depend on your location. Try not to place the windows facing either South or West as this will bake the inside of the mews. If you have any large trees, consider placing the mews under them. But be careful of any dead branches that might drop on the mews in a heavy wind storm.
A caution about trees. If you have eucalyptus trees, try to place the mews as far away from them as you can. Here in California eucalyptus has a higher aspers rate than any other tree. If you have no choice, be sure to keep any litter the trees drop cleaned away.
Preparing the area
 You’ve determined the best place for your mews and now it’s time for the hard work. Leveling the area. It doesn’t have to perfect, but it should be as close as you can get it.

To help you determine the size of the mews, lay down the 4 pressure treated 2 x 4′s. Have a look at the diagram for the configuration of the layout. It helps to screw the frame together. You can screw them through the ends, or get 4 angle brackets and use them to hold the 2 x 4′s together. They don’t have to be overly large. The are just to hold it together until you get the walls up. Use just a couple of screws in one corner to start, then lightly attach the opposite corner. Be sure the frame is square. One way to make sure is to measure diagonally from corner to corner. If the measurements match, your frame is square. When it’s square, secure all corners. The walls consists of two 4′ wide panels. If you place the walls in the same configuration, it will all fit together 8’x8′.
 Angle braces

Keeping burrowing animals out
If you have potential threats that might burrow into the mews, here is a way to keep them out.
Place several layers of garden cloth. Make it larger than the 8′ x 8′ area. Make each layer go 90° from the last layer. Add the hardware mesh. This too needs to be larger than the 8 x 8 area. Use the “U” stakes to hold the mesh down. Use a lot of these. The hardware mesh will have a tendency to lift up and really try your patients. Work from the center out placing the stakes as you go. You will need a hammer to lightly tap them into the ground. If you have a couple of helpers, they can use some scrap 2 x 4′s to stand on to help hold it down and move slowly outward as you go. When you get it all staked down wrap the extra hardware mesh up and around the pressure treated 2 x 4. Use a heavy duty staples to staple the hardware mesh to the 2 x 4.
Now, having said all this, if you don’t have any animals that would be a threat to your bird. skip all that, make the frame and move on.
Alternative foundation
An alternative method for the base is concrete pavers.

This method is my favorite method, is a lot easier and keeps the mews off the ground.You do not need the pressure treated 2″x4″. If you look at the image at the very end you will see the mews sitting on the pavers. Place the pavers on the level ground in an 8′ x 8′ square, then build the mews on top of them. If you are using the hardware cloth, place it under the pavers. No need to anchor the mews to the pavers. The weight of the mews will keep it in place. I like the pavers because they are wide and a lot easier to place, plus they won’t rot like wood will (even the pressure treated will eventually rot). When placing the pavers, I like to leave a small space between them. This allows water to drain when you’re cleaning the inside.
Building the panels
Time to build the panels. You can actually do this before you even start with the step above. It really doesn’t matter. As you make each panel, put them aside and stack them up out of the way. You can paint them now or wait until the mews is done.
Here are the three types of panels you need

How many of each you’ll need:
Full Panels – 7 (5 if you are going to make two window panels for the roof)
Small Window – 2 (optional)
Large Window – 2 You can add more windows on the sides if you want, but keep your climate in mind. If you live in a windy, rainy or cold climate, extra windows may not be the best. You want plenty of circulation, but also want to protect your bird.
A word about the windows in the roof. This is where you need to decide if the weather in your area warrents it. If you live in a hot dry climate, the roof panels is a good idea for lots of circulaltion. But if you live in a wet climate or get snow, this type of roof is not going to work for you. Plus, a flat roof in a very wet climate will rot. I have other roof alternatives further down. Check them out before you decide what will ork for you.
Making the panels
Full Panels

For each panel you will need 3 – 2 x 4 x 8′. Leaving 2 pieces the 8′, you will need to cut the third piece, but, it won’t be cut to 4′. In order for the finished frame to be exactly 4′ wide, the top and bottom piece needs to be cut 4′ minus the width of the two 8′ pieces. As you know, 2 x 4′s are not 2 x 4. They are actually about 1.75″ x 3.75″. So you need to measure the two 8′ pieces and subtract that from the 4′. When you screw the 4′ pieces inside of the two 8′ pieces, the finished measurement needs to be 4′.

A note about 2 x 4′s – Be sure they are actually 96″ (8′) . Some 2 x 4′s are actually shorter than 8′. So take your measuring tape with you to be sure you get the right ones
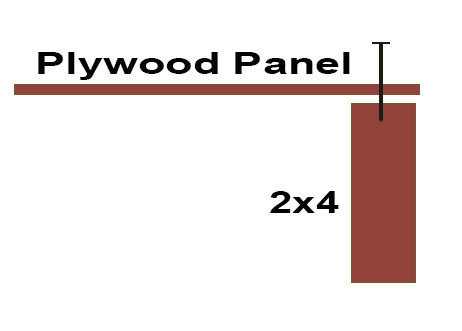
Make sure your 2×4’s are standing up and not laying flat. This will make your frame 4″ deep.

With the frame finished, lay the 4′ x 8′ plywood on top. Even up one corner and screw it to the frame using one screw and don’t tighten it up just yet. Now go to the opposite corner and even up the frame and the plywood. This will square it up. Check all around to be sure it’s all flush and put a screw in the opposite corner. Now you can screw the plywood to the frame all the way around. Be generous here. Try to put each screw about 9″ apart. Spread your hand and fingers out as wide as you can. That’s about right for the distance between the screws. If you don’t put very many screws in, over time the plywood will start to warp where there are no screws. Might as well put them in now.
That’s all there is to the full panels. I found this is quite strong and does not require any bracing in the center.
Window Panels

Make the frame the same as the full panel, but this time add another piece across the center (but not yet). See the instructions on making the bared window below) Cut a 4′ x 8′ plywood sheet in half.
The small window panel is made the same way, only the window is only 2′ instead of 4′. This window is optional and only if you feel you need a bit more ventilation.
A word about what you use for the bars.
DO NOT USE PVC PIPE OF ANY KIND.
There are a few reasons for this.
1. The sun will, over time, make the pvc brittle and break easily
2. PCV is extremely flexible. You might as well make the bars out of rubber bands. There is no strength and your bird can, and will, get out.
Attaching the bars
You need two more 2 x 4′s to fit the inside dimension of each window. Clamp these two pieces together and mark the center down the long way. Make your first mark 1-1/2: from the end, then mark every 2″ across the entire length. You should have 22 marks. Place this “sandwich” of 2 x 4′s on a couple pieces of scrap so you can drill through all the layers and not have the wood splinter as you go through.


Using a 7/8″ drill bit, drill at each mark through both pieces of 2 x 4 and scrap wood. Work slowly and keep your holes as straight as possible. Cut each 10′ length of conduit into 3 pieces, 2 – 4′ lengths leaving 1- 2′ length (this will be used for the small window panel in the back of the mews).Note: If you want to makes things easier for you, cut the 10′ conduits into 5′ lengths making larger windows. Be sure to adjust the frame to accommodate the larger size window. But this will not give you any left overs for the small windows.
CAUTION
If your using a circular saw, to cut the conduits, you must use a special blade for cutting these pipes. Using a circular saw will make a lot of sparks so be careful with what’s around you and keep a hose at the ready for any fires that might occur. If you’re using a reciprocating saw, it doesn’t seem to make the sparks so you’re OK. Just keep an eye on it.
Here is the easy way to get the bars into the window frame.

- Screw one of the 2 x 4 with the holes in it to the top of the frame.
- Position the second 2 x 4 with hols near the first.
- insert all the bars
- Slide the second 2×4 down to the end of the bars until it’s flush with the ends. Screw through the sides
- Screw a solid 2×4 flush with the ends of the bars. Screw through the sides
- Screw the plywood panel to the bottom half of the panel.
If you plan on adding screening, you can staple the screening on the outside of the window now or wait until it’s up. For a more finished look and to help the screen stay up longer, add a small trim around the window. 1 x 1 would work just fine. This step isn’t necessary, just finishes it off nicely.
You can make removable screens by making the frame fit on the outside of the window. Staple the screening to the back of this frame. You can add to the bottom of the window a couple of scraps of wood for the frame to set into. At the top make a couple more scraps of wood, but these will be loose and swing down to hold the frame in. It’s easy to remove them for cleaning. Or make the top scraps permanent after you place the screen in place.
Door

There are a couple of ways to make the door. One is to frame it out and use a pre-hung door. Or maybe you can find some used doors. The method below is the cheapest way to make your door.
Using a square, mark the door for your needs. If you are 6′, you don’t want your door to be only 5′ high. But you don’t want your door to be any larger than necessary. Make it just large enough for you and your bird to get through. Using one of the full panels, pencil out your door. Before you cut the door out, make a mark somewhere across the line. This will be your guide to make sure you hang the door the right way up. I like to make a large “V” at the top. Or you can just write TOP at the top of the door. Using a jig saw, cut the door out.

Now you need to reinforce the door so it doesn’t warp over time. Using the diagram above, use the 2 x 2′s and reinforce the door. On the inside of the panel, you need to cut 2 x 4′s and frame the door. Screw on the handles both on the outside and on the inside. Add the hinges. At this point you might find it easier to put the door on after the walls are all up.


On the outside of the door attach a padlock latch. Get the one with the swivel “eye”. This allows you to latch your door closed when you have your bird on your glove without having to put the padlock on.
On the inside, attach a hook and eye. This is to prevent the door from opening while you’re inside the mews

It’s important to place the door panel the correct way. It may seem strange to have the door open into a wall, but this gives the most security from your bird escaping.
Raising the Barn

OK, all your panels are built, and you’re ready to go. Since you already have the area leveled and prepped with the pressure treated 2 x 4′s or pavers, you can start putting up the walls. You will definitely need at least one helper here, two would be better. Start with a corner and place one panel then the other. While your helpers are holding the two panels, screw them together using your longer screws. Screw one from the left then the next from the right and so on. When you have them nice and tight together, screw through the bottom into the pressure treated 2 x 4′s. It should stand on it’s own now and you can start adding each panel. I f you are using pavers, obviously you can’t screw the panels into them.
Sometimes, especially if your pad isn’t as level as it could be, your panels don’t want to sit flush. Try using clamps to pull them together just long enough to screw them together. Pipe clamps work great if you have them or just a couple of guys pushing them together.
Alternative method of construction

An alternative to screwing the panels together is to use construction straps. This allows easier removal when it comes time to move the mews. Use three for each panel connection.
The Roof
This is the hardest part because the panels are heavy. You will need at least one other person to at least get the panels up. I have three different designs, but there are many different ways to handle this tricky problem. Well it’s tricky for me anyway. How to make the roof strong and secure and waterproof. Keep in mind when viewing these idea. I’m not a carpenter. I’m sure there are better ways of doing this, these are just some ideas.
Roof style 1
This style has two full panels that sit right on the walls.

If you look at this diagram, you will see three separate pieces that hold the actual roof at an angle. The front piece is a 2 x 6 x 8′, the center piece is 2 x 4 x 8′ and the back piece is 2 x 2 x 8′. Then 5 sheets of 10′ corrugated aluminum are placed across these three pieces. Each sheet should overlap the next sheet at least a couple of waves. The two outside sheets need enough overlap to fold down the side. The sheets are then attached to the three braces using either roofing nails or screws. Which ever you use, be sure to seal each screw or nail with silicone to water proof them. With the sheets secure on the top, the two side sheets are bent down the sides and secured with screws.
This style may look a little odd, but it has one really good advantage. The air can go through the corrugated sheets and keep your mews quite cool.

Roof Style 2

This style roof still requires two full panels for the roof,
but this time you will need 3 – 2 x 6 x 8′ .One of the 2 x 6 x 8′ is cut at a diagonal from one corner to the other making two wedge shapes. These are then attached to the walls. You can use tie straps to make is really secure. A 2 x 6 x 8′ is then attached to the front walls and screws to the side pieces. Now the two roof panels can be laid right on this wedge and screwed down. The top of the roof will need to be extended out past the walls for rain. This can be done with more plywood. For more waterproofing, you can cover the roof with any kind of roofing material. When nailing anything to the top, be aware that anything will penetrate to the other side, so you might want to finish the roof on the inside so it’s smooth and safe for your bird. If you decide to finish the inside, why not put some insulation in the roof before you do. This will help keep the mews cool in the summer.
Roof Style 3
This roof style is perfect for climates that are hot and dry. It allows air to circulate through and gives the birds the choice of standing in the sun or rain or moving to the back for more protection.
To make this roof simply make two more “window” panels.
One more Roof Style.
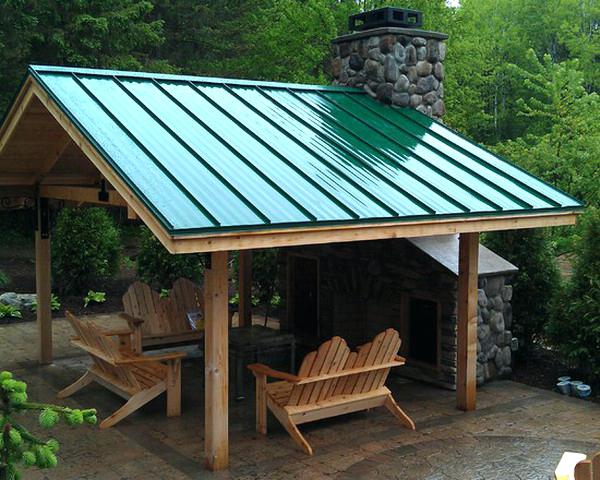
Metal patio roofing. This has to be my favorite style of roof .It’s a very easy and pretty quick way to make a roof. Lasts forever, and very light weight. Best of all, you can put it up yourself. Check with your local patio roof company, they just might have cut offs that they can’t use because they are too short. You can give the roof any amount of angle for rain run off and even include a gutter system. Here’s a photo of a patio cover that would look great on your mews. This type of roof would have several “joists” across the ceiling attached at an angle. On this would be plywood, then on that would be the roof. You don’t need to make the peak, just a single angle from front to back is fine. 1″ to 2″ rise is enough to let the rain run off. You may need a steeper pitch if you have to deal with snow.
There you have it for roof designs. The design you choose will depend on your climate. If you get a lot of snow,then style 3 probably isn’t a good idea.

Here in California, we don’t even know what snow is.
Finishing Your Mews
It’s important to seal your mews from the weather. I recommend outdoor paint. You can match the mews to your house color. You will need to apply two coats. The paint is much more durable than any kind of stain and will last many, many years longer. It’s also important to paint the inside as well. Cleaning the mews can be pretty wet, and the wood on the inside needs protection too. Be sure to let the paint dry for a few weeks before you add your bird. Just a precaution with the fumes.
Mews Styles
Single mews with an Entrance Chamber

Using the basic design, you can build an entrance chamber where you can keep your scales, equipment and freezer.
This single mews puts the entrance to one side. Add a barred window to the door into the mews so you can check where your bird is. The feeding shoots can be in the chamber for easier feeding. This is built with a single 4′ x 8′ sheet of plywood wide and 2 sheets deep.
Double mews with entrance chamber

When you have two birds, you can simply add a second mews on the other side of the entrance chamber.
Lean-to design

This design is perfect for Harris Hawks. Not so much for a red-tail unless you are going to keep her tethered. Move the door to the back and add a safety chamber or add a safety chamber on the side. The construction is the same using simple pre-made panels. If your mews has a door on it, you can add the weathering area to the front. The door to the weathering area acts as a second door. Then is would be perfect for a red-tail.
It’s important to check with your state requirements. This design may not pass inspection in your state.
These designs and ideas can be altered to suit your needs or states requirements.

Pre made building
Use a pre-made building and add on to it. This idea is perfect for the lean-to style. Add the weathering area on the front. Change the window to bars. Don’t forget the safety chamber. This one is large enough you can build the safety chamber inside.
Safety Doors
Poor man’s safety door .
If you’re unable to build an entrance chamber right now, this is a way to create a security door.
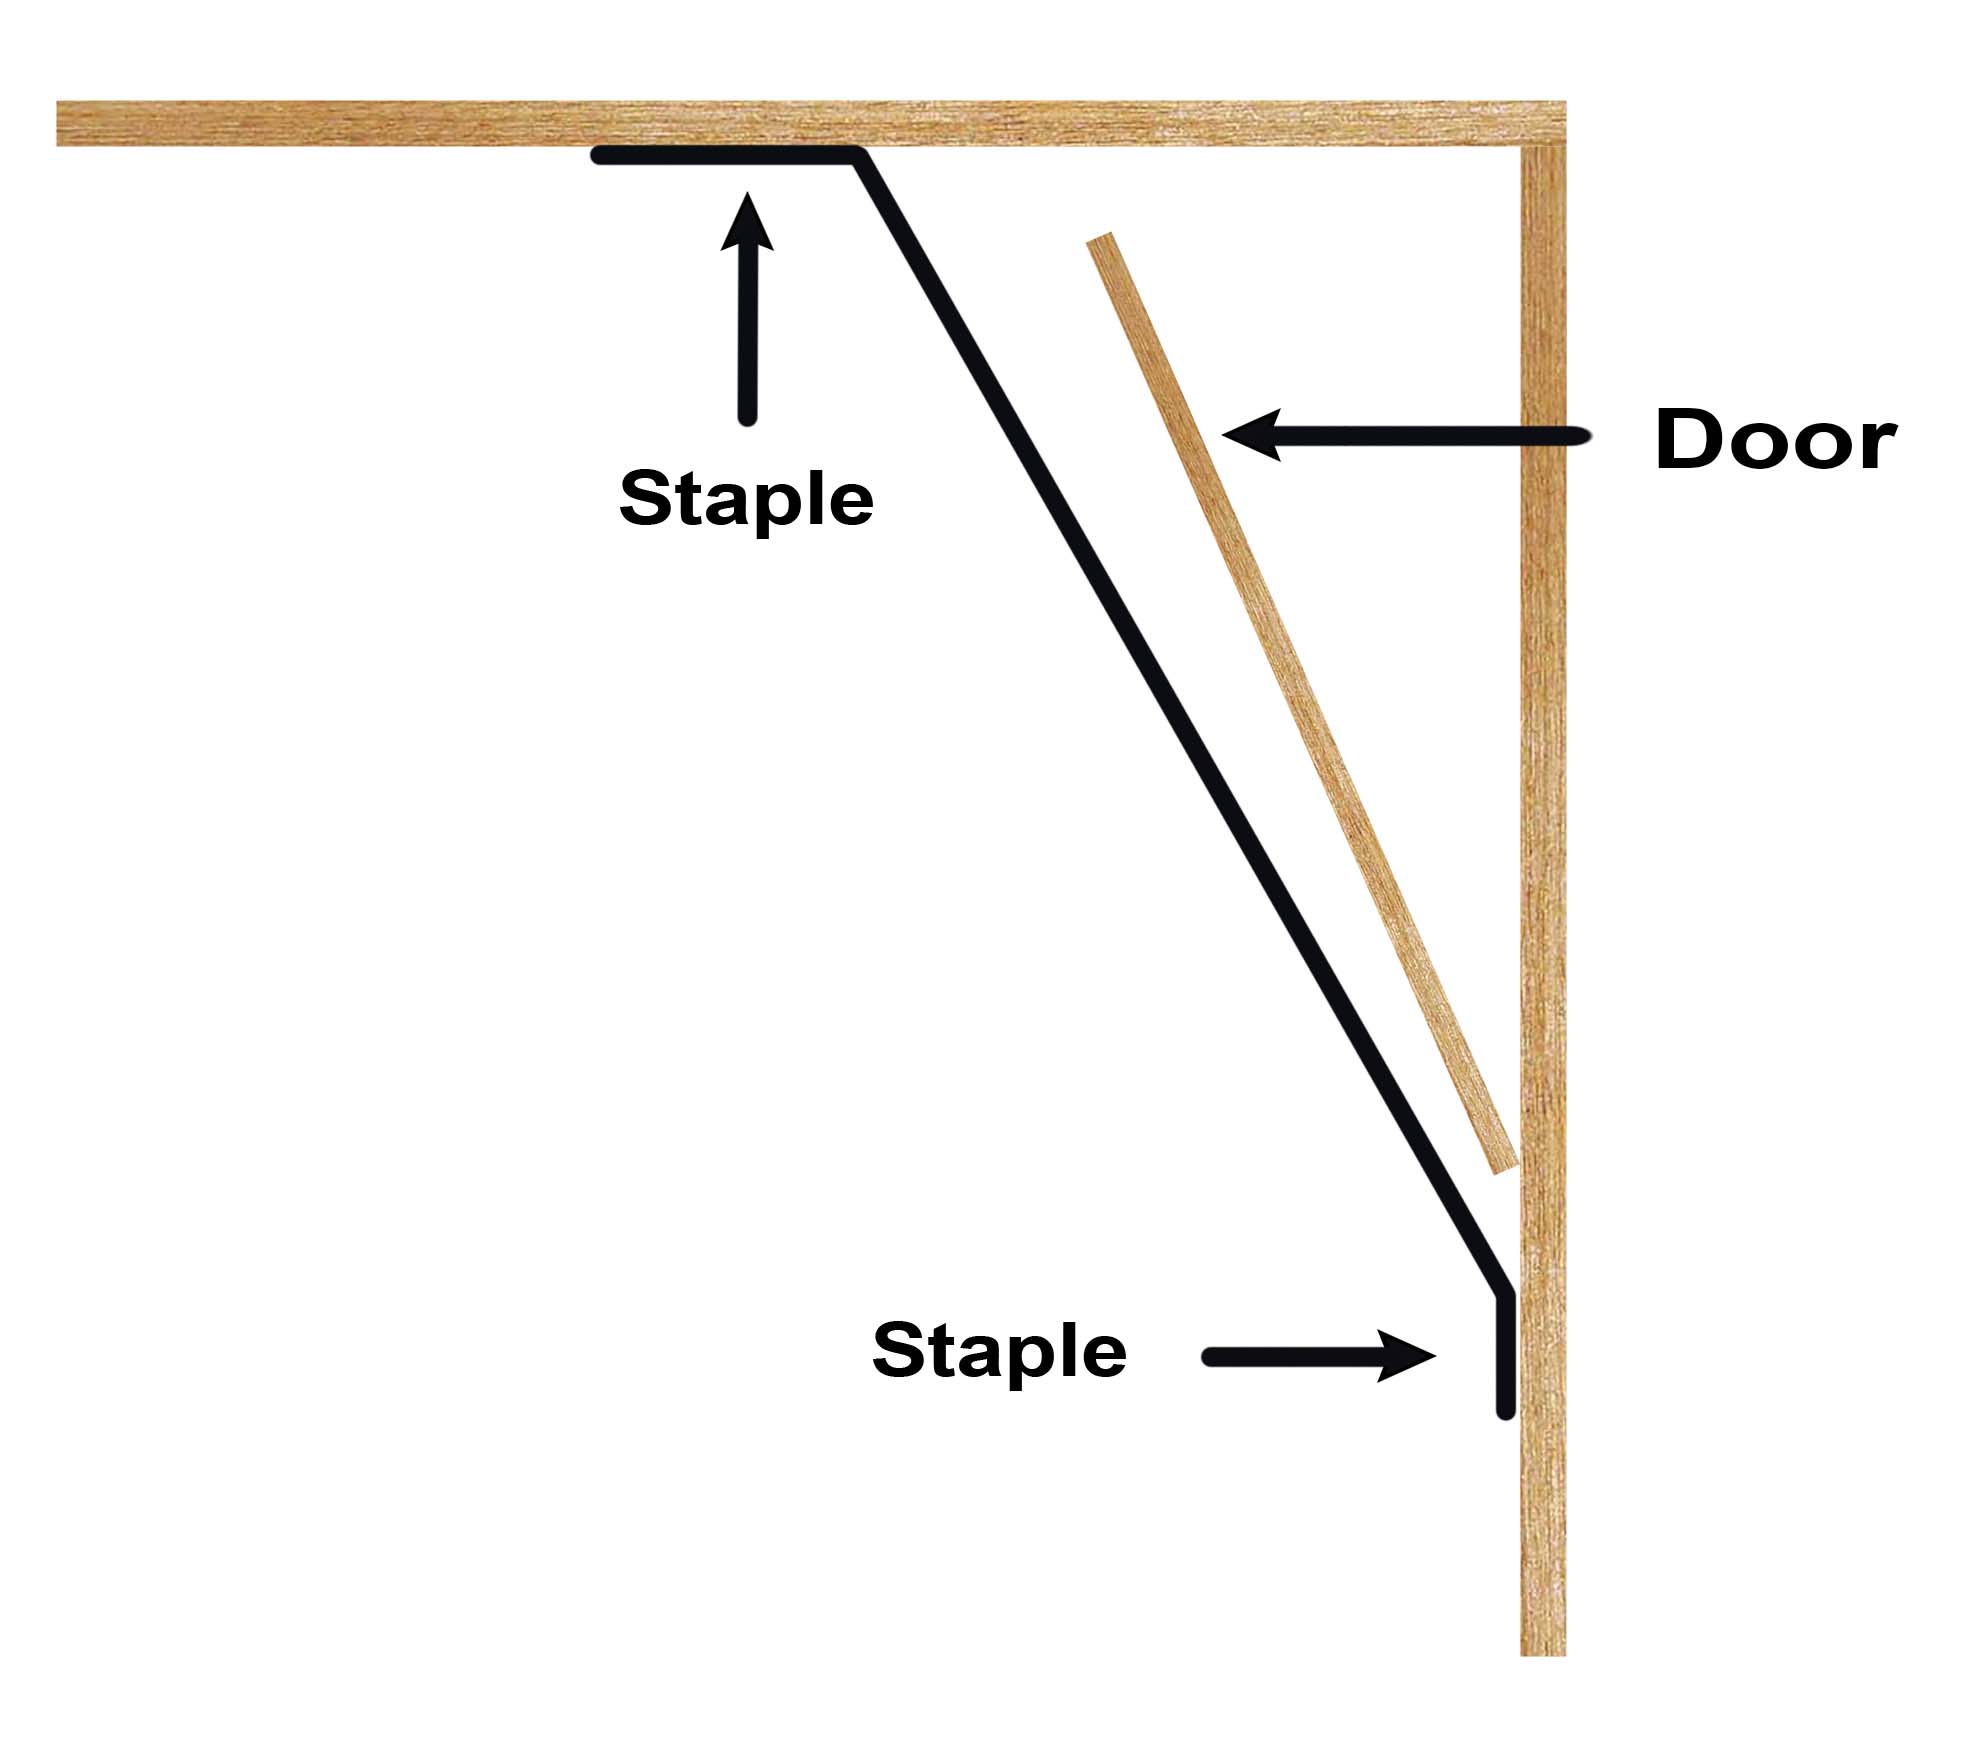
When I first became a falconer, I had to build on a very tight budget, so I came up with this system and used it for 13 years. Find one of your old flat sheets for your bed. Guys, be sure to ask your wife before using one of her good sheets. A twin size is perfect. If you only have queen size sheets, you can cut it in half. Staple the sheet across the top 2 x 4 and down the frame. This keeps the sheet in place when you open the door. On the other side, staple just to the top frame. Now, when you open the door, you have something blocking it and preventing your bird from flying out. It can take a bit of getting used to getting in and out with your bird, but it’s a cheap way to get started. WARNING: This may not pass your local inspection.
Later you can build a proper double door system outside.
Lattice Safety Door

This security chamber is easy to construct. Build the frame and attach pre-made lattice. The lattice can be a bit wobbly so be sure to add several cross beams for more security. Add the door on any side that works for you. Be sure to make it big enough so you can get in and out easily with your bird. I find 4′ x 4′ to be fine.
My favorite set up is to have the weathering area in front of the mews. You have to go through the weathering area to enter the mews. I have this area covered with shade cloth and attached to the mews.
Floor
You can now finish the floor of your mews. I haven’t found anything better than pea gravel.
Now for a few details.
Feeding shoot
What you need
• 1 – 4″ PVC 90 degree pipe connector
• 1 – 4″ PVC straight pipe connector with male thread at one end
• 1 4″ PVC cap with female thread
• A very short piece of straight 4″ PVC pipe. This needs to be just long enough to connect the two pieces through the plywood.
• PVC glue


Mark where you want your shoot to be. I like this to be high enough that I don’t bump my head on it, but you can put it anywhere you want. Using a jig saw, cut the hole. Go slow and carefully. You want the 4″ PVC pipe to just slip in the hole. A little tight is good. Dry fit the pieces together to make sure all fits well. Now using PVC glue, glue the outside piece to the short piece of pipe and slip it through the hole. On the inside glue the90 degree piece to the pipe coming through the hole. Adjust it so the 90 degree connector is straight down and silicone around them on both the inside and outside so they are sealed against the plywood.
An Alternative Feeding Shoot
Here’s another way to make a feeding shoot. Use a dryer vent with a flapper and hood.
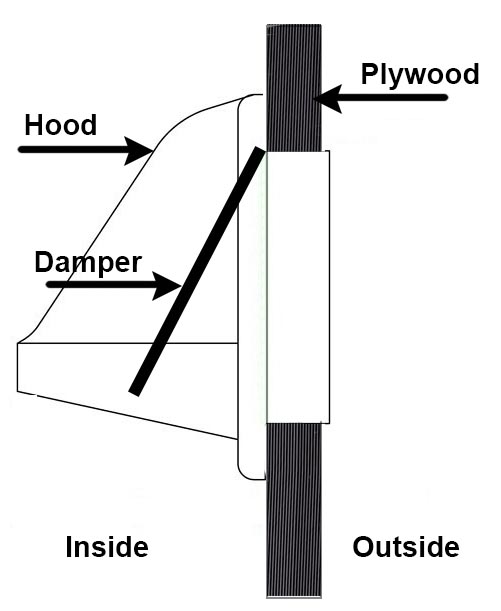
Use a hole drill that fits the flange. This should be a tight fit. Place the damper and hood on the inside. The outside doesn’t really need anything as long as the fit is tight. Place a perch under this on the inside. There are different styles and are made from metal or plastic. You can also place this close to the ground.
“T” Perch
What you need. PVC is fine for making
perches. Because they are out of the sun.
• 1 – 1″ galvanized flange
• 1″ connector with male threading
• 1 = 1″ PVC 45 degree pipe connector
• 1 – 1″ “T” PVC pipe connector no threading
• 1- length of 1″ PVC pipe – small scraps will do just fine
• PVC glue
• door mat grass to cover the perch
• cable ties to hold the grass mat to the perch
• 2 – 1″ end caps with no thread for the end of the perch – these are optional

“T” perches are great to keep your birds tail from getting scrunched. This is an easy one to make. Be sure to use the highest grade of PVC. The size depends on the size of the flange you can get. I found the 1″ PVC to be just right.
The threaded flange is made of galvanized steel. This is screwed to the wall where ever you want it. I had mine screwed to the two center posts between the windows. Next screw on the 45 degree PVC connector making sure it’s facing straight up. The “T” connector is then glued to the 45 connector. I added a couple of scraps of PVC to each end of the “T” connector to lengthen the actual perch. Be careful you don’t make it too long or it will become too weak. A few inches is fine. You can add two end caps if you want, but I found it really isn’t necessary. Cover the perch with door mat grass using several cable ties and it’s done.
Congratulations! You completed your mews.
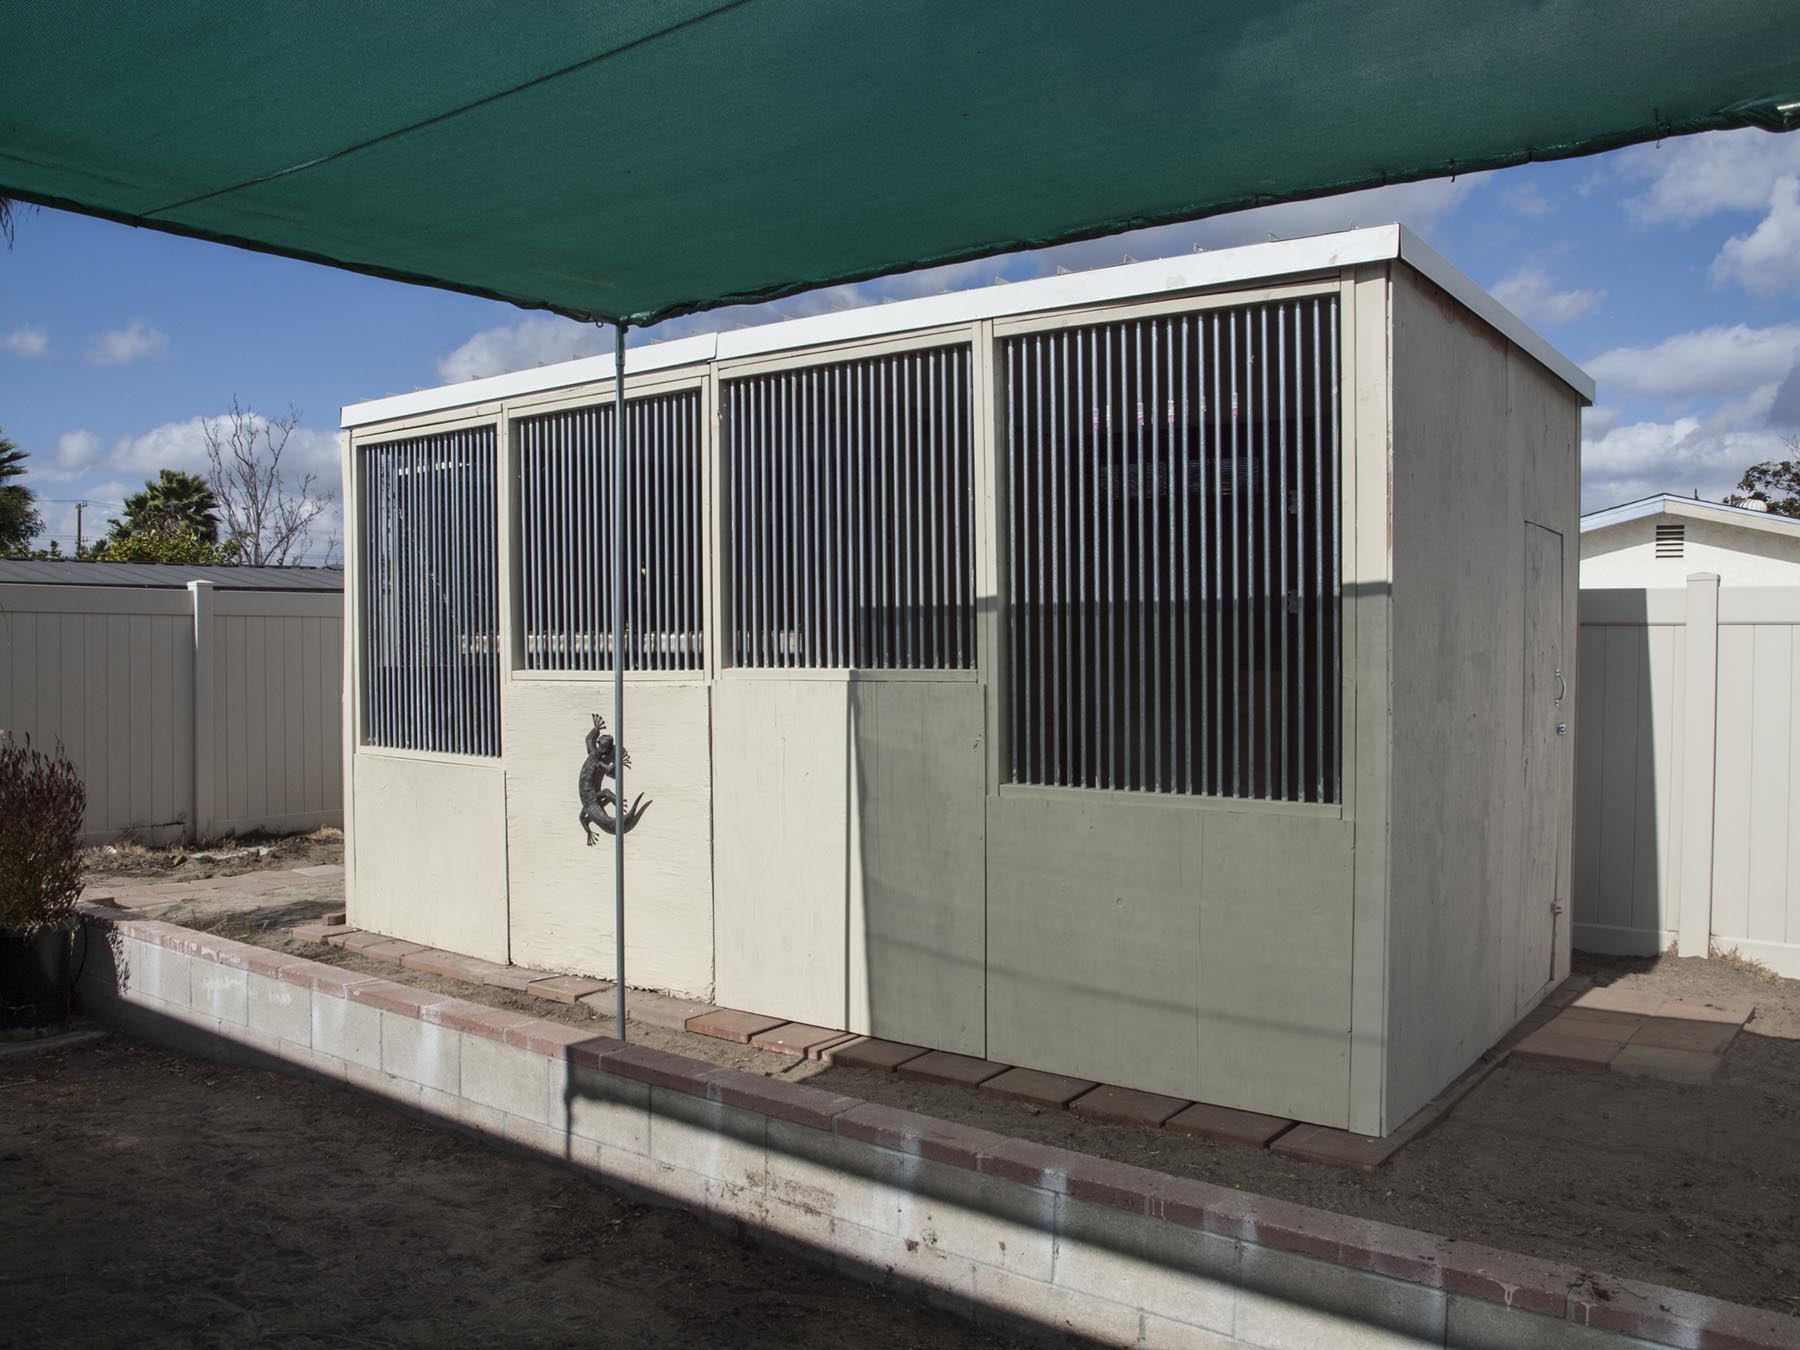
It can be very intimidating when starting this “little” project, but if you take it one step at a time you can do it. Here is my mews. The half on the left was made from various panels left over after several moves. Some of those panels are over 13 years old! The other half on the right was an addition for my second Harris Hawk. I took about 1-1/2 months working on the weekends. This has the metal patio roofing and concrete pavers sitting on sandy soil. I did it completely by myself. OK, a good friend put the roof on, but I could have done it easy. I chose a paint color to match the fence. I’m going to let you in on a secret. I was 63 when I made this! So, there are no excuses to not get started on yours.

You can spend a fortune on all the equipment you might need. I’ll show you how to make your own. From anklets and leashes, to lures and perches. Hoods can be expensive and hard to find the right fit. I’ll show you how to make your own.

Outstanding!!! Love the simple step-by-step.
LikeLike
Thank you Gregory, I’m glad it was helpful to you. Although it’s pretty basic, it gives you someplase to start and sometimes, thats all you need. If you have any questions, I’d be happy to try and answer them.
LikeLike
Hello! I am using this tutorial now to build my first falconry mew. We are ready to raise the walls, but we are a bit confused on how to attach the corners together? We are hoping we didn’t miss a step when building the panels! Any information you have would be great! Thanks!
LikeLike
I’m so glad this has helped you so far. There are a couple of ways to attach the corner panels. You can use long screws from the inside to the other panel. I would use a minimum of 4 going from the top to the bottom. Make sure they are placed to grab the 2×4 on the other panel. Another way to attach them is to use construction straps. These are flat and square used to attach two 2×4’s together. The straps would have to be on the outside, but if you paint them they will pretty much disappear.I would use at least 3 per corner and at least 4 screws per strap. Please send me a photo of your finished mews. I would love to add it here to show others.
LikeLike
Thank you so much!! That helps a lot! Cheers
LikeLike
Go to Lowes. They have an 8×8 shed kit for about $500. It was all precut wood. So just screw it all together
LikeLike
Email me and I can send you pictures gaa_1964@hotmail.com
LikeLike
I already have everything built, just putting it all together. Thank you though!
LikeLike
Hi every one, am planning to to have any hybrid falcon. I want to know how much small mew will be enough for her and in that can I molt her leaving free loft not on a block?
LikeLike
I don’t know a lot about falcons, but I do know those that have them never free loft them. You need to find someone that flies falcons and ask them about it.
LikeLike
Hi, Can you tell me What kind of paint should I use to paint my mews wood so that the wood doesn’t rot for a long time and is non poisonous so my bird doesn’t get killed by the paint.
LikeLike
Any exterior house paint is fine. I like acrylic because it’s easy to clean. The wood will soak up the paint so you will need at least two coats. If you don’t have a bird yet, I would also paint the inside. Be sure to let it dry for several days before putting a bird inside. It will make clean up super easy. You can just hose the walls down.
LikeLike
could you possibly post some inside pictures of your mews?
LikeLike
I don’t have any photos of the inside, but there really isn’t much to see. The 2×4 are on the inside. People get a little crazy about this because they don’t understand that there are no horizontal 2×4 for the bird to grab onto. The only horizontal 2×4 are the windows. I found that the 4 x 8 plywood really didn’t need to be braced with a center horizontal 2×4. Just use plenty of screws to attach the plywood to the frame. I’ve had my mews up for 19 years and 3 moves and have never had a problem with the plywood warping. I have a perch in one corner and a shelf perch in another. That’s it. Hope this is helpful.
LikeLike
CORRECTION: The chicken wire would become the roof not the ceiling. The canvass and shade cloth would eventually be the ceiling if we were to install the chicken wire on top of each of these.
LikeLike
I’m not sure I like the sound of this, but I might not be understanding. How are you going to protect her from rain? How will you prevent the canvas from becoming moldy and rot? The canvas will get soaked in a downpour and become quite heavy. This may cause the roof to collapse. You would be better off making smaller frames and covering the roof with hardware cloth with a small size opening, then cover some of it with the shade cloth. You can leave some of the hardware cloth without the shade cloth for her to get into the sun if she wants.
LikeLike
The canvas is supported by a heavy duty A-frame pipes so that water runs down off the canvas on to the ground. Thank you for your suggestions.
LikeLike
I have a question regarding the conduit bars section. In the diagrams, it shows the 2×4 sections lying flat, the same as the rest of the frames. Which means that I would need to bore holes through the “4 inch” length of the 2 pieces of wood clamped together, not the “flat” of the wood.. But in the diagram with the 7/8th inch spade and the clamps, it shows the boards clamped together to drill through the flat along the centerline. This makes more sense to drill, for sure, but it I attach these pieces to the rest of the doorframe, they will be not be flush with the frame, and will be sticking inside or outside of the interior a bit. Is this how you screwed those crossbars that the cinduit fits through in? Was the excess placed on the inside of the mew, or the outside, or 50/50?
Thanks!
-Brian
LikeLike
Good question Brian. It can be difficult to explain these detail. You are right about drilling the holes on the “flat”, but I’m not sure why you have an overhang. You are screwing the frame together so the 2×4’s are all gong the same way. If you look at the frame face on, you only see the 2″ sides all around. So essentially the “box” you just made is 4″ deep. The plywood is screwed to the frame into the 2″ side. Does that make sense? So, when you put the windows in with the conduits, you are still placing the 2″ face out and should be flush with the frame. I hope that was helpful. Please feel free to ask if it’s not.
LikeLike
Uh oh. That’s where we’ve gone wrong then. We’ve built 5 panels, and cut all the crosspieces assuming they were lying flat on the plywood. I think we looked at the diagrams just above the “window panels” section, and assumed that all of those were the 2×4 timber pieces lying flat, since the depth wasn’t really shown.
Or is it preferable to go back and “double up” all the frames already created and lay down another 2×4 so that they are the correct thickness?
Thank you so much for your advice and quick response!
-Brian
LikeLike
Oh No! I’m so sorry my diagram wasn’t clear. In your case, you might as well just keep gong. As far as the window. I’d make the inside lip as small as possible. Otherwise your bird will try to land on it and may end up trashing it’s feathers.
LikeLike
Under the “Preparing the area” section, judging by the configuration of the 8 feet long pressure treated 2×4’s, it looks like the outside dimensions of the mews are actually 8 feet 4 inches square. Am I seeing that correctly?
LikeLike
That’s a good point. You can cut the 2×4 to make the square exactly 8’x8′ I’ll make the change in the instructions
LikeLiked by 1 person
Since you answered my first question so fast, I’m going to try another one lol. Do you have any suggestions on a way to create an opening to change out the bath pan without having to open the door to get inside the mews?
LikeLike
Good question. I’ve seen where you can open a small panel and remove the pan. Or have a system where the bath pan is a bit more permanent. More like a shallow bath tub. There is a drain and opening to hose it out. But, these are a lot fancier than you really need. If you remove your bird to a weathering area, this is a good time to get in and clean the mews and change the water.
LikeLiked by 1 person