
All of these instructions have been tried and tested for many years by myself and I stand by them. If you follow the instructions as I state them, your equipment will give you many years of service. BUT:
If for any reason you feel
the equipment is not safe

Climbing Rope Leash
One of the easiest ways to make a leash is with climbing rope. It’s extremely durable and resists even the strongest bird that likes to pick at their equipment. A good weight for a red-tail hawk is 5-6mm rope. Anything larger is just too heavy. This size ties well and is not too cumbersome. Here are some resources for rope. The only problem with buying on line is you have to buy a lot more than you need. If you have a store you can visit, you can usually buy their rope by the foot. Each leash is only about 3′ long so buy about 12′ to make several.
Here are a couple of good supplies of mountain rope
REI
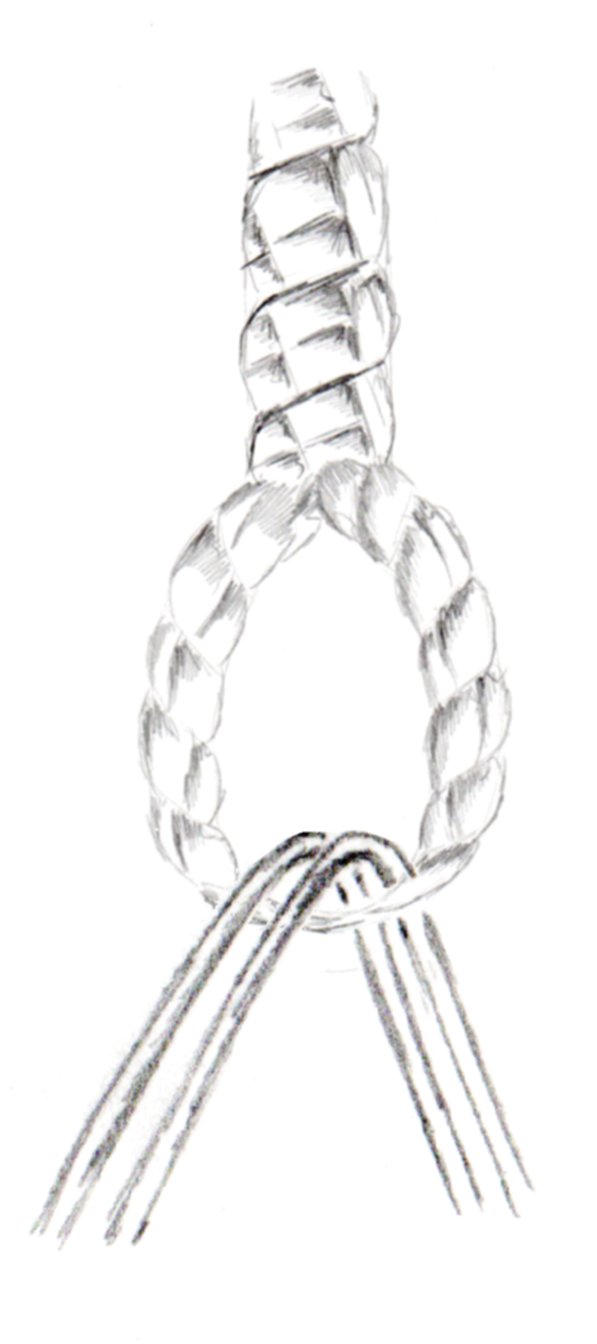
All that is required for this leash is to melt the ends to keep them from unraveling. At one end you want to tie a large knot so it won’t go through the swivel. Here is a knot that is nice and round and stays a good size. Cut a 3′ length of rope and melt one end neatly.
 Fig 1 shows the beginning of the knot. Be sure to leave enough end length to finish the knot. You will probably have to do it a couple of time until you get enough without wasting to much.
Tighten by pulling the end and the loop at the top. Working the rope so it lays flat and smooth.
 Fig 2 – Bring the end across the wraps and to the back, then through the loop at the top. Hold the knot at the wraps and pull the longest end. Pull this end as tight as you can. Cut off the excess and melt the end. It’s best if you melt part of the knot as well. Wet your thumb and quickly smooth the melted rope. This will bind the end with the rope. To really finish off the knot I like to use Plasti Dip. I dip it in and let it dry overnight, then apply a second coat. I’ve never had a bird work this stuff off yet. Even an eagle.

If you find the knot is still a bit too small and is in danger of slipping through the swivel, add a leather button. Punch a hole just large enough to work the end of the leash through it and work it up to the knot. If you find even this is not enough, you can make two rounds of leather and sandwich a washer in between. Glue the sandwich together with the washer inside.
Braided Nylon Cord Leash
 This is braided mason line that works really well. You can get this at any hardware store. Home Depot always has it. Be sure when you purchase it, that it is braided and not twisted. The twisted comes untwisted in time.
 This leash has the button built in. First you need to make a button for the end. Cut a thick piece of very stiff leather a little bigger than your swivel . If you don’t have very thick leather cut two and glue them together. (Fig 1.)
Punch two holes just big enough for two strands to go through.(Fig. 2)

Now you can start your leashes. I find it a lot easier to work the braids when the end is attached to something. This allows you to keep a constant tension on the braid. It’s important to keep the tension and pull the strands tight for a uniform look. When you get down to the end of the braid. Even up the ends and melt them together. It’s important to melt them well or your leash will unravel with time. Especially if you have a bird that likes to pull and pick at her equipment.
Here are two different ways to braid your leash.
Four Strand Sennit – Round
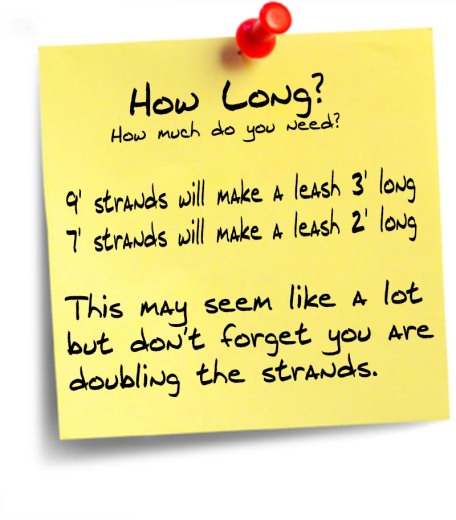
 Cut two strands 9′ long. String through the button
and even the ends. The pattern here is very easy.
Under two, back over one.
Start with A – under B and C and back over C
Next is D – under C and A and back over A
Alternate the opposite outside
strand. The final leash will be 3′ long. This leash has
some give and spring to it as well.
Four Strand Sennit – Flat
 This is for those that like the flat leashes.
The pattern here is over two, over one.
Starting with the left outside strand (A), pass
it over the next two strands (B and C). Using the
right outside strand, (D) pass it over one (A).
Back to the left outside strand (Which is now B), pass over two, (C and D) right outside strand, (A) pass over one (B).
It seems complicated when you read it, but when you start braiding, it all becomes clear.
 Braided Buttonless Leash

 This leash is called a “buttonless” leash. It doesn’t use the knot or leather button at all. I prefer this style of leash. I think it’s a lot more secure. Use the strand material of your choice. I use a braided Dacron from Melton Tackle 130# line.

1. Cut 4 cords 9′ long. Melt all the ends. Even up the ends and find the center of the cords. Now back up 1- 1/2″ and start braiding. Braid a 4 strand round as above for 3″
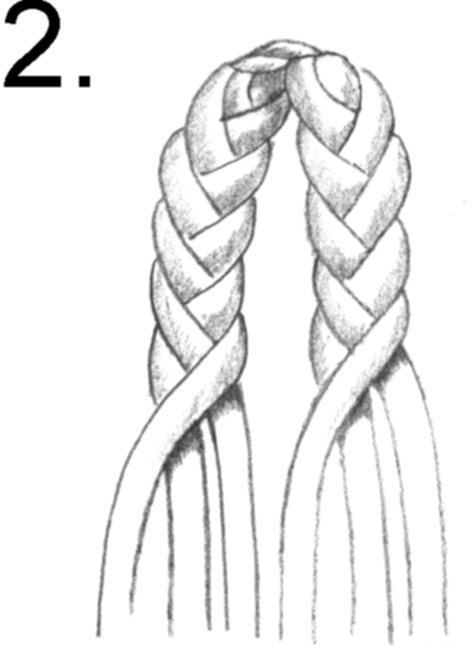 Double the braid in half and pair up the strands so you now have 4 double strands. The illustration at the left shows only three strands but it’s the same as 4 strands. When starting the double strand braiding,
 use a tight tension for the first several braids. This will make a nice tight braid at the beginning. You can now use a more comfortable tension for the rest of the braid. Continue braiding the 4 strand round as above. Even up the ends and melt.
 To use this style of leash, insert the loop into the swivel and bring the other end up and through the loop, pull snug against the swivel.
This is the only leash I ever use. No clips to fail, no buttons to slip through.
Tapering the end of a braided leash

When getting to the end of the braid, one way to finish the end is to taper it down. This makes for a better end with less bulk. Here is how you do it.
As you get closer to the end start dropping one of the double strands. Drop one and braid a couple of times, drop the next one and braid a couple of times. Continue until you are only braiding with single strands and braid a couple of times. Now even the ends and melt well. Go back to each end and cut a little away from the leash and burn it down to the leash. Wet your thumb and quickly smooth the melted strand into the leash. Do this with each end.
Finishing the braided leash

When the leash is attached to the swivel, it can be difficult to grab hold of and get it loose enough to remove. Here is a way to grab it easily. Were going to make a braided tab.
1. Cut two cords 6-7″ long of the same material you made the leash from.
2. Bring the ends through the loop at the end of the leash and even up the ends. You now have 4 ends.
3. Braid the cords using the round 4 cord braid as described above for at least 1″.
When you start the braid, use a lot of tension so the tab sits tightly against the loop. After 4-5 braids, you can relax and finish the tab.
4. Cut the ends even and melt well.
When you want to remove the leash from the swivel, grab the tab and pull. The leash is now loose and can be removed easily.
Setting the braid
After you have completed the braiding you need to “set” the braid. There are two ways to do this.
1. Roll the braid between your hands. Use a vigorous action and work your way along the entire braid. You can roll it back and forth on your knee as well.
2. Set the braid on the floor or table and place a piece of wood over it. With your feet or hands (don’t put your feet on the table) roll the braid. Don’t be afraid to use pressure.
Your braid will now have a more uniform look and the braiding will have settled into each other.

Hello,
I’m interested in making these leash and all items
Illustrated in this article.
I’ve looked for books online and didn’t have much luck.
Would you happen to know of some books that can teach me.. I would greatly appreciate any assistance you may provide
Thank you,
William Valencia
480.748.5279
LikeLike
What is it you need to learn that my blog doesn’t teach you? I’d be happy to clear up anything that you don’t understand.
LikeLike
Hello,
I’m looking for braiding “How to” books, I’m new to all of this and am interested in paracord projects as explained above. I’m also interested in braiding a leash for falconry but have had no luck in finding such a book. The above blog along with photos explained the how to on paracord leash..
Any assistance would be greatly appreciated.
Thank you for your time,
Wm. Valencia
LikeLike
I agree, there isn’t a lot out there in the way of books. I think your best bet would be to Google “How to braid cord” or somthing similar. You other good source is YouTube. YouTube will actually show you step by step how to braid cord. Books are OK, but there is so much on the internet you don’t need to spend the money.
LikeLike
Thank you
LikeLike
Do you have tutorial for the Modified Fox Loop leash and the Layman mods? I haven’t found one for the double loop Fox Loop with button.
LikeLike
I’m sorry, I don’t have a pattern for that one. But if you study one, you should easily come up with a pattern.
LikeLike
Question: can you braid a fox loop leash or modified fox loop leash on a marudai or kumihimo disk? Changing from 8 strand to 4strand and back again on one of these should be possible.
LikeLike
I don’t see why not. A braid is a braid. Make sure your braid is firm with no loose loops.
LikeLike